Desktop Tools and Development Environment Previous page   Next Page

Adding Your Own Demos

If you offer a toolbox or a collection of M-files to other users, you can include demo files and provide access to them from the MATLAB Help browser Demos tab.

Each product has a demos.xml file that describes the available demos. MATLAB reads all of the XML-files that reside on the search path or in the current directory to build the Demos tab contents. To add your own demos, create a demos.xml file for your toolbox, which includes pointers to your demo files. The term toolbox is used here for convenience, but the same concept applies to a blockset or any name you give to your M-file collection.

Follow these steps to add your own demos to the Help browser:

  1. In the Editor/Debugger, create a demos.xml file in a directory that is on the search path or in the current directory.
  1. For this example, you can open 
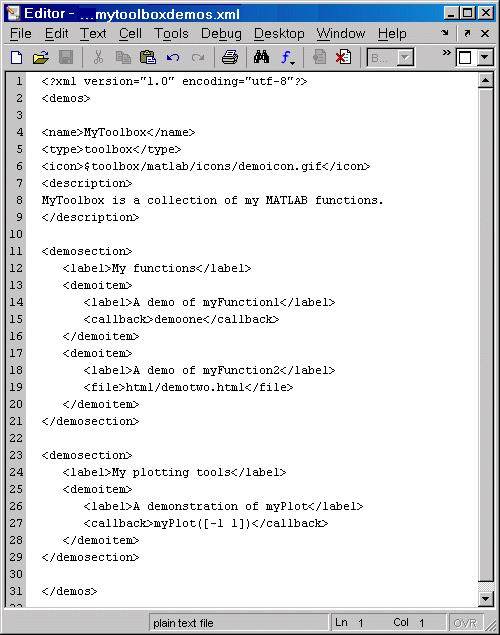
matlab/help/techdoc/matlab_env/examples/mytoolboxdemos.xml and save it as demos.xml.

    Image of the file mytoolboxdemos.xml open in the Editor.

  1. Using the XML tags listed in the following table, provide the information for your demos in the demos.xml file.
  1. The root tag is <demos>. The contents of this tag can include the <name>, <type>, <icon> and <description> tags, which describe the set of demos that you are adding.

    Those tags may optionally be followed by <demosection> tags, grouping your demos. Each demo section, in turn, will contain <demoitem> tags that correspond to the individual demos.

    Within one demos.xml file, all <demoitem> tags must either be children of the <demos> tag directly, or must all be within <demosection> tags. That is, you cannot have a demo item as a child of <demos> followed by some demo sections. If you mix these two modes, the file will not load properly.

    Line
    XML Tag
    Value for Example
    Notes 
    2
    <demos>
    No value
    The root element for a demos.xml file.
    4
    <name>
    MyToolbox
    Name of the toolbox being added.
    5
    <type>
    toolbox
    The product category. Allowable values are matlab, simulink, toolbox, blockset, other. This determines where your entry appears in the Demos pane. Setting this to toolbox will make MyToolbox in this example appear under Demos -> Toolboxes. Within a category, entries are displayed in alphabetical order.
    6
    <icon>
    $toolbox/matlab/icons/
    demoicon.gif

    You can use icons supplied with MATLAB, which are in matlab/toolbox/matlab
    /icons
    . This value uses a relative pathname: $toolbox is the matlab/toolbox directory.
    7
    <description>
    MyToolbox is a collection of my MATLAB functions.
    The description that appears in the Help browser display pane, on the main page of your demo.
    11
    <demosection>
    No value
    This begins a grouping of individual demo items: <label>, <description>, and as many <demoitem> tags as you wish to have demos in this section.
    12
    <label>
    My functions
    The title that will be shown for demo sections or demo items. For a demo item, this tag is required.
    13
    <demoitem>
    Lines 15 and 16
    You need one of these tags for each demo entry. Contains the tag <label>, and a <callback> and/or a <file> tag.
    14
    <label>
    A demo of myFunction1
    Gives the demo item a title.
    15
    <callback>
    demoone
    The callback runs when you double-click the demo icon or click the title text for this demo item in the right-hand pane.
    19
    <file>
    html/demotwo.html
    An HTML file that displays in the Help browser when the customer selects the demo in the list (optional). This is a relative path from the location of the demos.xml file.
    none
    <dependency>
    Not shown
    Lists another product, such as another toolbox, that is needed to run the demo (optional). There can be any number of these. The text must match a product name specified in an info.xml file on the search path or in the current directory.

  1. Start the Help browser and open the Demos tab by running demo in the Command Window or by selecting Start -> Demos.
  2. Right click in the list of demos and select Refresh to be sure the Help browser is including your demos.xml file. Your demos should now appear in the Demos pane.

For additional examples, look at other demos.xml files for MathWorks products. To list them, run

which -all demos.xml

Previous page  Adding Your Own Help Files in the Help Browser Preferences for the Editor/Debugger Next page

© 1994-2005 The MathWorks, Inc.