| Image Processing Toolbox User's Guide |
  |
Adjusting Contrast and Brightness
The Adjust Contrast tool provides several ways you can change the size of the window to change the mapping between pixel values and display intensities. This example illustrates these capabilities.
- View an image in the Image Tool. This example opens the image
pout.tif, which is a low-contrast image.
- Start the Adjust Contrast tool by clicking the Adjust Contrast button
 in the Image Tool toolbar, or by selecting Adjust Contrast from the Tools menu in the Image Tool.
- The following figure shows the image displayed in the Image Tool with the Adjust Contrast tool open in a separate window. In the figure, note how pixel values in the image histogram are clustered in the middle of the dynamic range. Note that the display range, shown in the lower right corner of the Image Tool, is the full dynamic range of the image.
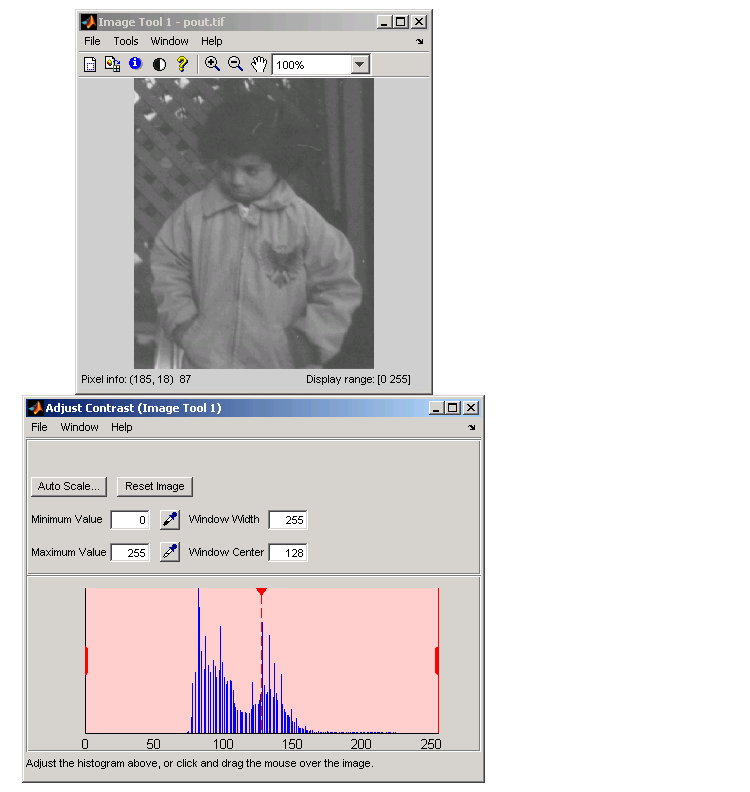
Image with Default Pixel Value to Display Intensity Mapping
- Adjust the contrast by changing the size of the window overlaid on the image histogram. The Adjust Contrast tool provides several ways to change this window:
- By grabbing one of the red handles on the right and left edges of the window and dragging it. If you shrink the window from the left, the image becomes darker. If you shrink the window from the right, the image becomes lighter.
- By specifying values in the Minimum value and Maximum value fields and pressing Enter.
- By clicking the dropper button associated with the minimum or maximum value fields. When you do this, the cursor becomes an eye dropper shape. Position this cursor over the pixel in the image you want to be the minimum (or maximum) value and click the mouse button.
- By specifying values in the Window Width and Window Center fields and pressing Enter. These values provide another way to specify the size of the window.
- If, while making interactive adjustments to contrast and brightness, you want to return the image to its original state, click the Reset Image button. The following figure shows the Adjust Contrast tool with the window resized. For information about adjusting the contrast using the Auto Scale button, see Autoscaling.
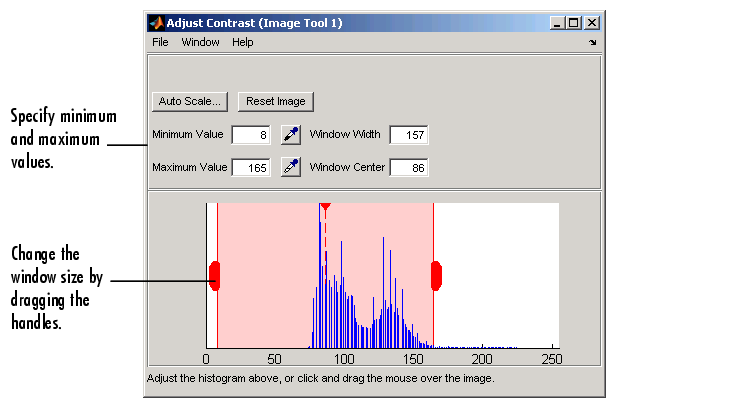
Adjust Contrast Tool with Window Resized
- Adjust the brightness by moving the window to the left or right, without changing its size. Move the cursor anywhere in the window, and click and drag the window.
The following figure shows the pout.tif image after contrast adjustment. Note that the Image Tool updates the display range values displayed in the lower right corner of the Image Tool window.

Contrast Adjusted Image
| | Understanding Contrast Adjustment | | Using the Window/Level Tool | |
© 1994-2005 The MathWorks, Inc.