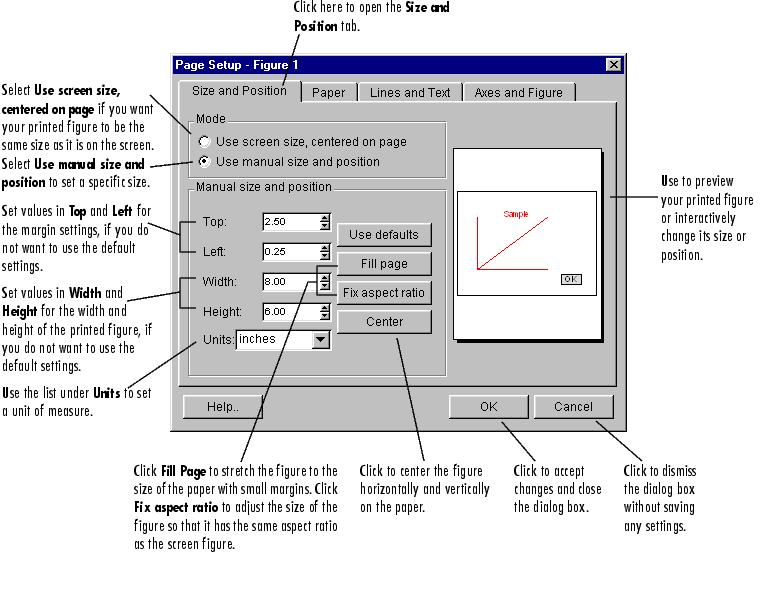
Components of the Size and Position Tab

For more information on the Size and Position tab, select one of these topics:
See Basic Printing and Exporting for examples and general information about printing and exporting figures.
Further Details About the Size and Position Tab
Use screen size, centered on page: Select this option to print your figures at the same size as they are on the screen. This is a good option to use if your figure includes uicontrols and you include them in your printout. Uicontrols may not print very clearly if printed at a different size than on the screen. When this option is selected, you cannot set values for Top, Left, Width and Height. However, you can resize the figure interactively by clicking and dragging the figure window, and Top, Left, Width, and Height are updated. If you do not select this option, MATLAB ignores any resizing done to the figure window. Note that your resolution setting should be set to screen resolution, or the printed size is not the same. Use the Windows Document Properties dialog box or the UNIX Printing Options dialog box to set resolution.
Use manual size and position: Select this option if you want your printed figure to have a specific size. This is the default. Use the Width and Height boxes to change the size. The size can also be set manually in an easy interactive way. See Interactively Changing the Figure Size and Position for instructions.
Top: Select this to set the top margin for the figure on the paper. By default, it is set to 2.5 if the paper orientation is set to portrait. Type in a new value, or use the arrow buttons to select one. This box is grayed out if Use screen size, centered on page is selected.
Left: Select this box to set the left margin for the figure on the paper. By default, it is set to 0.25. Select the part of the value you want to change, and then type in a new value, or use the arrow buttons to select one. This box is grayed out if Use screen size, centered on page is selected.
Width: Select this box to set the width for your printed figure. By default, it is set to 8 (inches). Select the part of the value you want to change, and then type in a new value, or use the arrow buttons to select one. This box is grayed out if Use screen size, centered on page is selected.
Height: Select this box to set the height for your printed figure. By default, it is set to 6 (inches). Select the part of the value you want to change, and then type in a new value, or use the arrow buttons to select one. This box is grayed out if Use screen size, centered on page is selected.
Units: Use the list under Units to set a unit of measure. MATLAB uses the unit of measure for the values specified for the paper size, and the size and position of the figure on the paper. If the unit is changed, the numeric values for the paper size and figure size convert appropriately. Inches (the default), centimeters, and points are absolute units. (One point equals 1/72 of an inch.) Normalized units map the lower-left corner of the figure to (0,0) and the upper-right corner to (1.0, 1.0). The unit setting made in the Size and Position tab is reflected in the Paper tab.
Center: Click to center the figure on the page both horizontally and vertically. The values of Left and Top are pdated appropriately. If the figure is too large to fit on the page, Left and/or Top are set to negative values.
Fill page: Click to resize your figure so that it fills the page. A margin of 0.25 inches is used on all four sides. Note that Fill page may alter the aspect ratio of your image.
Fix aspect ratio: Click to resize your figure so that it has the same aspect ratio as the figure displayed on the screen. The aspect ratio is equal to the width divided by the height.
Figure placement on paper: Use as a preview of your printed figure or as a means to interactively change its size or position. The size and position of the box that represents your figure changes as you make changes to the other components on the Size and Position tab. You can make this work in reverse: you can change the preview image directly and the values of the other components are updated automatically. See Interactively Changing the Figure Size and Position for detailed instructions on changing the size and position from this window.
Interactively Changing the Figure Size and Position
To set the width and height interactively, go to Figure placement on paper, and resize the box that represents your figure by dragging its sides.
Hold down the mouse button and resize the figure as desired. Notice that the values in the Width and Height boxes update as you resize.

To set the margins interactively, go to Figure placement on paper, and drag the gray box representing the figure to a new position. Notice that the values in the Left and Top boxes update as you move.
