| Image Processing Toolbox User's Guide | |
Specifying Matching Control Point Pairs
The primary function of the Control Point Selection Tool is to enable you to pick control points in the image to be registered, the input image, and the image to which you are comparing it, the base image. When you start cpselect, the point selection tool is enabled, by default.
You specify control points by pointing and clicking in the input and base images, in either the Detail or the Overview windows. Each point you specify in the input image must have a match in the base image. The following sections describe the ways you can use the Control Point Selection Tool to choose control point pairs:
This section also describes how to move control points after you've created them and how to delete control points.
Picking Control Point Pairs Manually
To specify a pair of control points in your images,
 . Control point selection mode is active by default.
 .
.
cpselect places a control point symbol at the position you specified, in both the Detail window and the Overview window. (The appearance of the control point symbol indicates its current state. Initially, control points are in an active, unmatched state. See Control Point States for more information.
| Note Depending on where in the image you pick control points, the symbol for the point might be visible in the Overview window, but not in the Detail window. |
cpselect places a control point symbol at the position you specified, in both the Detail and Overview windows. Because this control point completes a pair, the appearance of this symbol indicates an active, matched state. Note that the appearance of the first control point you selected (in step 3) also changes to an active, matched state.
You pick pairs of control points by moving from a view of the input image to a view of the base image, or vice versa. You can pick several control points in one view of the image, and then move to the corresponding window to locate their matches. To match an unmatched control point, select it to make it active, and then pick a point in the corresponding view window. When you select a match for a control point, the symbols for both points change to indicate their matched state. You can move or delete control points after you create them.
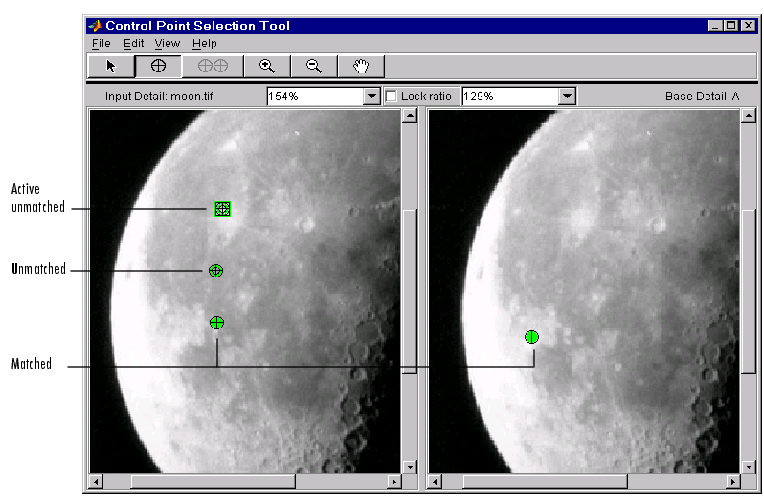
The following figure illustrates control points in several states.
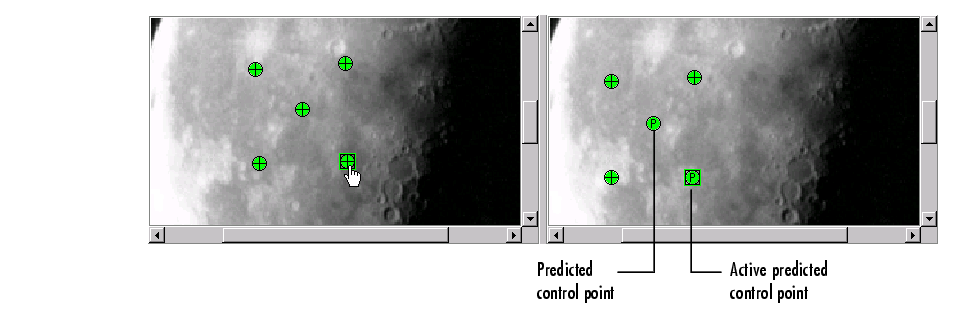
Using Control Point Prediction
Instead of picking matching control points by moving the cursor between corresponding Detail or Overview windows, you can let the Control Point Selection Tool estimate the match for the control points you specify, automatically. The Control Point Selection Tool determines the position of the matching control point based on the geometric relationship of the previously selected control points.
Note
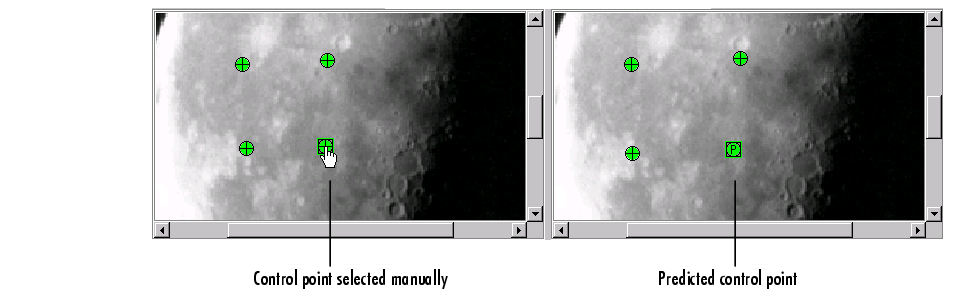
By default, the Control Point Selection Tool does not include predicted points in the set of valid control points returned in input_points or base_points. To include predicted points, you must accept them by selecting the points and fine-tuning their position with the cursor. When you move a predicted point, the Control Point Selection Tool changes the symbol to indicate that it has changed to a standard control point. For more information, see Moving Control Points.
|
To illustrate point prediction, this figure shows four control points selected in the input image, where the points form the four corners of a square. (The control points selections in the figure do not attempt to identify any landmarks in the image.) The figure shows the picking of a fourth point, in the left window, and the corresponding predicted point in the right window. Note how the Control Point Selection Tool places the predicted point at the same location relative to the other control points, forming the bottom right corner of the square.
To use control point prediction,
 .
.
.
.
Control Point States
The appearance of control point symbols indicates their current state. When you first pick a control point, its state is active and unmatched. When you pick the match for a control point, the appearance of both symbols changes to indicate their matched status.
This table lists all the possible control point states with their symbols. cpselect displays this list in a separate window called a Legend. The Legend is visible by default, but you can control its visibility using the Legend option from the View menu.
Moving Control Points
 or the Default Cursor button
  .
.
If you move a predicted control point, the state of the control point changes to a regular (nonpredicted) control point.
Deleting Control Points
To delete a control point, and optionally its matching point,
or the Default Cursor button .
Undoing and Redoing Control Point Selections
You can undo a deletion or series of deletions using the Undo Delete option on the cpselect Edit menu.
After undoing a deletion, you can delete the points again using the Redo option, also on the Edit menu.
| | Viewing the Images | Saving Control Points | |
© 1994-2005 The MathWorks, Inc.