| Image Processing Toolbox User's Guide | |
Example: Registering to a Digital Orthophoto
This example illustrates the steps involved in performing image registration using point mapping. These steps include:
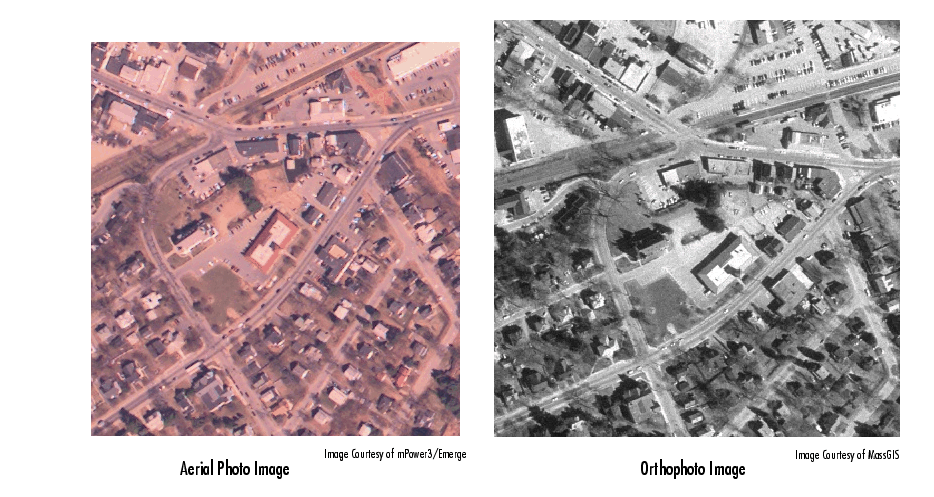
To illustrate this process, the example registers a digital aerial photograph to a digital orthophoto covering the same area. Both images are centered on the business district of West Concord, Massachusetts.
The aerial image is geometrically uncorrected: it includes camera perspective, terrain and building relief, and internal (lens) distortions, and it does not have any particular alignment or registration with respect to the earth.
The orthophoto, supplied by the Massachusetts Geographic Information System (MassGIS), has been orthorectified to remove camera, perspective, and relief distortions (via a specialized image transformation process). It is also georegistered (and geocoded)--the columns and rows of the digital orthophoto image are aligned to the axes of the Massachusetts State Plane coordinate system, each pixel center corresponds to a definite geographic location, and every pixel is 1 meter square in map units.
Step 1: Read the Images into MATLAB
In this example, the base image is westconcordorthophoto.png, the MassGIS georegistered orthophoto. It is a panchromatic (grayscale) image. The image to be registered is westconcordaerial.png, a digital aerial photograph supplied by mPower3/Emerge, and is a visible-color RGB image.
orthophoto = imread('westconcordorthophoto.png');
figure, imshow(orthophoto)
unregistered = imread('westconcordaerial.png');
figure, imshow(unregistered)
You do not have to read the images into the MATLAB workspace. The cpselect function accepts file specifications for grayscale images. However, if you want to use cross-correlation to tune your control point positioning, the images must be in the workspace.
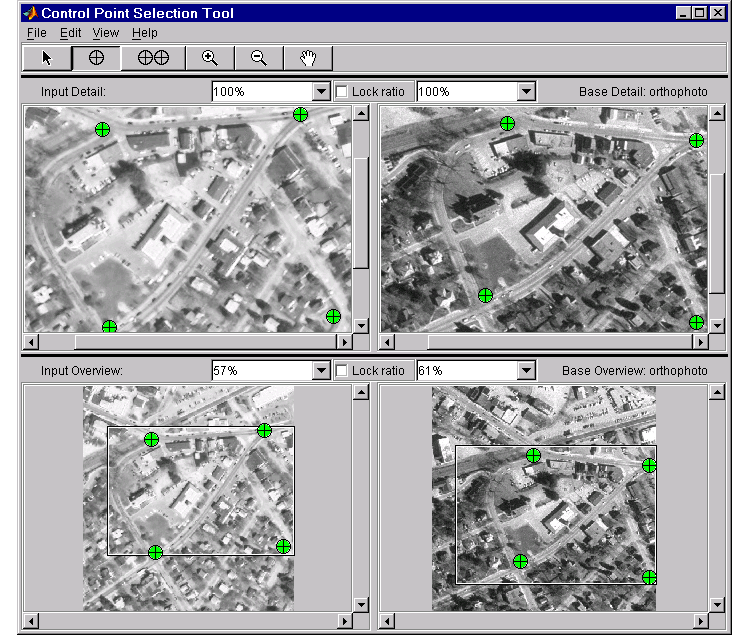
Step 2: Choose Control Points in the Images
The toolbox provides an interactive tool, called the Control Point Selection Tool, that you can use to pick pairs of corresponding control points in both images. Control points are landmarks that you can find in both images, like a road intersection, or a natural feature.
To start this tool, enter cpselect at the MATLAB prompt, specifying as arguments the input and base images.
Note
The unregistered image is an RGB image. Because the Control Point Selection Tool only accepts grayscale images, the example passes only one plane of the color image to cpselect.
|
The cpselect function displays two views of both the input image and the base image in which you can pick control points by pointing and clicking. For more information, see Selecting Control Points. This figure shows the Control Point Selection Tool with four pairs of control points selected. The number of control point pairs you pick is at least partially determined by the type of transformation you want to perform (specified in Step 5). See Types of Supported Transformations for information about the minimum number of points required by each transformation.
Step 3: Save the Control Point Pairs to the MATLAB Workspace
In the Control Point Selection Tool, click the File menu and choose the Save Points to Workspace option. See Saving Control Points for more information.
For example, the Control Point Selection Tool returns the following set of control points in the input image. These values represent spatial coordinates; the left column are x-coordinates, the right column are y-coordinates.
Step 4: Fine-Tune the Control Point Pair Placement
This is an optional step that uses cross-correlation to adjust the position of the control points you selected with cpselect. See Using Correlation to Improve Control Points for more information.
input_points_corr = cpcorr(input_points,base_points,...
                           unregistered(:,:,1),orthophoto)
input_points_corr =
  120.7086   93.9772
  319.2222   78.9202
  127.1046  289.8935
  352.0729  281.1445
Step 5: Specify the Type of Transformation and Infer Its Parameters
In this step, you pass the control points to the cp2tform function that determines the parameters of the transformation needed to bring the image into alignment. cp2tform is a data-fitting function that determines the transformation based on the geometric relationship of the control points. cp2tform returns the parameters in a geometric transformation structure, called a TFORM structure.
When you use cp2tform, you must specify the type of transformation you want to perform. The cp2tform function can infer the parameters for five types of transformations. You must choose which transformation will correct the type of distortion present in the input image. See Types of Supported Transformations for more information. Images can contain more than one type of distortion.
The predominant distortion in the aerial image of West Concord (the input image) results from the camera perspective. Ignoring terrain relief, which is minor in this area, image registration can correct for this using a projective transformation. The projective transformation also rotates the image into alignment with the map coordinate system underlying the base digital orthophoto image. (Given sufficient information about the terrain and camera, you could correct these other distortions at the same time by creating a composite transformation with maketform. See Performing General 2-D Spatial Transformations for more information.)
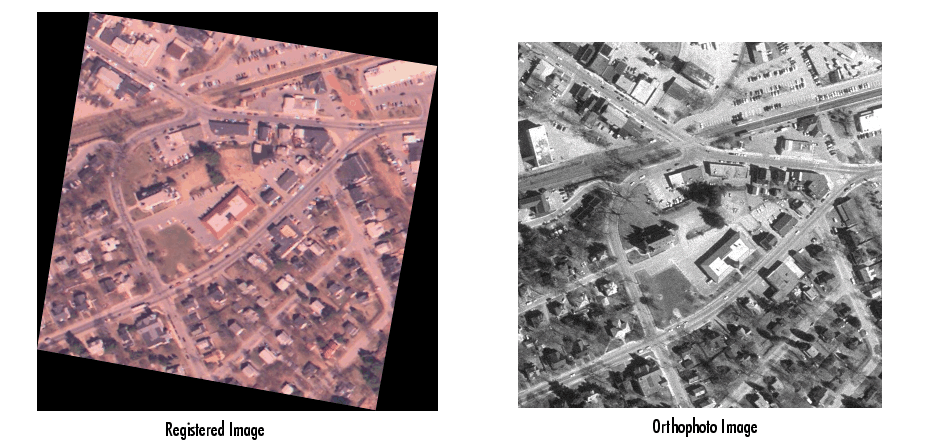
Step 6: Transform the Unregistered Image
As the final step in image registration, transform the input image to bring it into alignment with the base image. You use imtransform to perform the transformation, passing it the input image and the TFORM structure, which defines the transformation. imtransform returns the transformed image. For more information about using imtransform, see Spatial Transformations.
Note
imtransform applies the transformation defined in mytform, which is based on control points picked in only one plane of the RGB image, to all three planes of the input image.
|
Compare the transformed image to the base image to see how the registration came out.
| | Point Mapping | Types of Supported Transformations | |
© 1994-2005 The MathWorks, Inc.